It Not "Just Recess" Anymore!

Teachers often heave a sigh of relief when they take their students out to recess. Finally! The children can burn off the pent up energy they had been accruing for the past few hours indoors. But what if we change our outlook on outdoor play time? What if we create an outdoor environment that offered all of the learning opportunities that one would typically find indoors? What if children could run out to a well-planned play yard to find experiences in math, science, nature, dramatic play, water, building and construction, sensory activities, physical development, art and music? What if they play yard developed critical thinking, discovery, problem solving, and cooperative skills? The result would be that we wouldn't have "just recess" anymore. We would have The Outdoor Classroom!

Tuesday, October 25, 2011

The case for RAMPS and PATHWAYS - Link to EXCELLENT YouTube Video

This is a fantastic series of videos outlining the benefits of using ramps and pathways in the classroom (or in the OUTDOOR CLASSROOM!). The videos are based on the book, Ramps and Pathways: A Constructivist Approach to Physics with Young Children, available from NAEYC. Funny enough, we just bought the book at our center, but these videos represent much of the same content.

The teachers on the videos use cove moulding for their ramps, but gutters, pvc pipes, swimming noodles (cut in half or whole), clear hoses, and even blocks work for the same purpose.

Wednesday, October 19, 2011

NEEDED: Nature Inspired Ideas!

Do you have any wonderful nature-inspired ideas to share? Our Outdoor Classroom is always filled with so many fabulous activities. We have dramatic play, music, art, blocks, sensory bins, fine motor, sand, writing, bikes and more. But it always seems that "nature" itself gets overlooked. We garden, we play in the sand, and we've added the token box of "Nature Exploration" items (pinecones, tree cookies, etc) to the sandbox. But I want to add MORE! Any ideas? I would love to hear your thoughts.

Also, I was told by my director that we have a bundle of 8 foot willow branches for use in the Outdoor Classroom. I would love to use them, but I am stumped as to how. If you have any photos or ideas for adding willow branches to the environment, please help. THANKS!!


You can post your ideas in the comments or post to the Linky below.

Exploring Nature With Children


More Fun With PVC

We have been playing with PVC pipes and connectors in our Outdoor Classroom for the past while. I put various sizes of pipes and connectors into a small dry paddling pool (set on top of a table) and let the children explore force and motion with marbles, ping pong balls and golf balls.


We rolled, launched, and even painted with the creations. After visiting Teacher Tom's site and seeing the exciting things he was doing with pendulums, I had fully intended to follow suit this week and use my PVC to create a pendulum sand swing. I dyed some sand blue, added blue glitter, then dumped it into the dry pool. I rigged a PVC structure to make a pendulum with a funnel at the bottom. The intention was to scoop the sand into the funnel, give it a swing, and then the sand would make circular designs caused the circular swinging motion (see Tom's pendulum paintings). It was going to be really cool! Well, the children came outside and saw my contraption. A lot of oohs and ahhhs, and then all at once asked (I'm not kidding...every single child), "Sooooo....how do we put the marbles in? Where do the marbles go?" "Marbles?" I ask. "Oh. No, no, no, no...this is a pendulum. We will swing sand with it and make neat designs." I was gazed upon with disappointment. LOTS of disappointment. They did give the contraption a quick swirl. But then, "So we don't get to use the marbles?" And at that, my sparkly swinging sand was a complete bust. Needless to say, out went the pendulum  and in went the pipes, connectors and marbles!


We kept the sand and the funnels since this added extra interest - they could pour the sand through the connected tubes to see where it would come out! They were thrilled and played happily for the remaining portion of the hour.


The pendulum was moved to the "construction" area.


I removed the funnel and added a ziplock filled with sand. This became a "wrecking ball" for the block structures. 


The set of children who were playing in that area were quite amazed by the pendulum and it was a roaring success.


Ah, the joy of the "emergent" curriculum!


Today, I removed the sand and added over 30 feet of 3", 6" and 12" cut PVC with connectors. The added pipes allowed the children to build more complex structures.

This boy was extremely focused and creative with the PVC. He made a "4",

he made an "h"

and next it was a horse!


We sat together and concentrated his efforts further. He began to assemble the pipes vertically and soon it became this upright "goal post." Several children came to join the fun as we tossed bean bags through his goal post.

This boy was intent on putting marbles through the tubes. He would listen for the sound of the rolling marbles and would find the hole through which the marble would fall.


Saturday, October 15, 2011

A Few Storage Tips and Tricks


I really enjoyed Jenny's blog (Let the Children Play) this week about creative ways to store loose parts in the Outdoor Classroom. I wanted to piggy back on her post because I LOVE to learn about creative ways to organize the environment. 

There were so many great ideas on her post. She was kind enough to feature my idea about using milk crates for outdoor storage (to get directly to the post, click here). Milk crates are a wonderful "loose part" in themselves, but they are also a terrific way to store shovels, buckets, natural items, pvc pipes, mud kitchen materials, and more. They can be hosed down, the sand falls through, and they can be easily labeled. We have several classrooms ages 2 - 5 who use the same playground, so labeling is essential for us.  Each class in our school is asked to "reset" the Outdoor Classroom (ie - clean it up!) before the next class comes out to enjoy the yard. 


Another great storage trick we have is our 3 bin sensory/water tables. These tables were custom made and hold 3 removable utility bins. They are very simple and wouldn't take much to recreate. When we are using playdough, we put cafeteria trays over the bins to create a flat and elevated surface on which to roll and mould the dough. We store the tools in the middle bin. When it is time to clean up, we pop the playdough in a bag, and everything goes under the trays. 


Take note and look UNDER this table...the tires and tarp are for overnight storage. We lay the tarp on the table and hold it down with tires. The tires are also used as "loose parts" in our Outdoor Classroom.


When we are playing with water, goop, ooblek, etc., we take off the trays and put it straight in the bins. 


This table is EXTREMELY versatile!


Our outdoor "Quiet Corner" is an old bathtub! We've stacked blankets inside so the children don't have to sit too low into the tub and lined the top with pillows to make it extra soft. The books are stored in a simple woven basket. This is a covered area, so we do not do anything to protect it overnight or on weekends.

Use baggies to keep make clean-up a breeze!

I have worked in education for years and have always dreaded cleaning up the paint jars. When I started my role at this preschool, I was so impressed to see their idea for creative cleanup...line the jars with ziplock bags! Not overly environmental, but we do keep the same liners for a week since they don't tend to dry out. We store the jars in a caddy in the shed overnight. We wash the brushes and tops as needed.

Our 2's teacher used cafeteria trays and lined the tables with towels for their cornstarch and water sensory experience (click here for the ooblek recipe and the science behind it; and if you haven't tried it, you MUST!!!!). It was a neat change from the traditional method of using a bin. She provided colored water in recycled applesauce containers, spoons, and cups of cornstarch for the children to explore. 


When our 3's teacher was planting flowers in pots, she lined the ground with a tarp and put the dirt in utility bins (we have as many of these bins as we do milk crates!!!). She provided child sized gardening tools and she let the children do the potting. When the project was complete, we rolled up the tarp and dumped the contents over our raised garden beds. 


Since we received WAY too many Pansies this season, I had each child plant a Pansy in a cup to take home. I used the same tarp and bin method, but we sat at a table since we were on the patio.


This is one of our "diorama" tables. They were also custom made by the same person who made our other sensory boxes. Again, these tables would be VERY simple to build. To make this sensory box, we lined the table with a tarp (for easier cleanup), and then poured in cornmeal, rice and beans.


This is the same table in use during our "dino dig." To the left, you can see our other diorama table which we used for the "science lab" area.  
We also use these tables for Duplo, Lego, tree blocks, doll houses...you name it!

Tarps and tires cover pretty much everything that needs to be protected at night. In the morning, set up is quick and easy as I just have to fold the tarps and toss the tires to the side. Remember, tires are a fantastic loose part, so they are part of the children's play environment.

I hope you found these tips useful. Please feel free to add your own clever ideas!


Thursday, October 13, 2011

PVC = Science and Art!

When I was asked to take over the "patio" responsibility at our school, I had to think for a long time about what angle I was going to take with the activities. The patio is designed for the 3 - 5 year olds and is our version of "indoor/outdoor" flow for an hour during their free choice time. Though I work with the teachers on specific activities to strengthen particular skills, the rest is for me to "take it and run."


I envisioned a beautiful art area filled with ample resources such as recyclables, jars of paint, and oodles of colored paper. I thought about it, but then it occurred to me that our "Project Room" serves that exact purpose (click here to visit the I Work 4 Kids blog, written by our Project Room teacher).
Well, I could do dramatic play, puzzles, and fine motor. Nope...that is already IN the classroom! It finally struck me that large science, gross motor, messy art, water play, nature-oriented and sensory activities were just what we needed for the children who would be "naturally inclined" to choose the outdoor space for their free time activities.


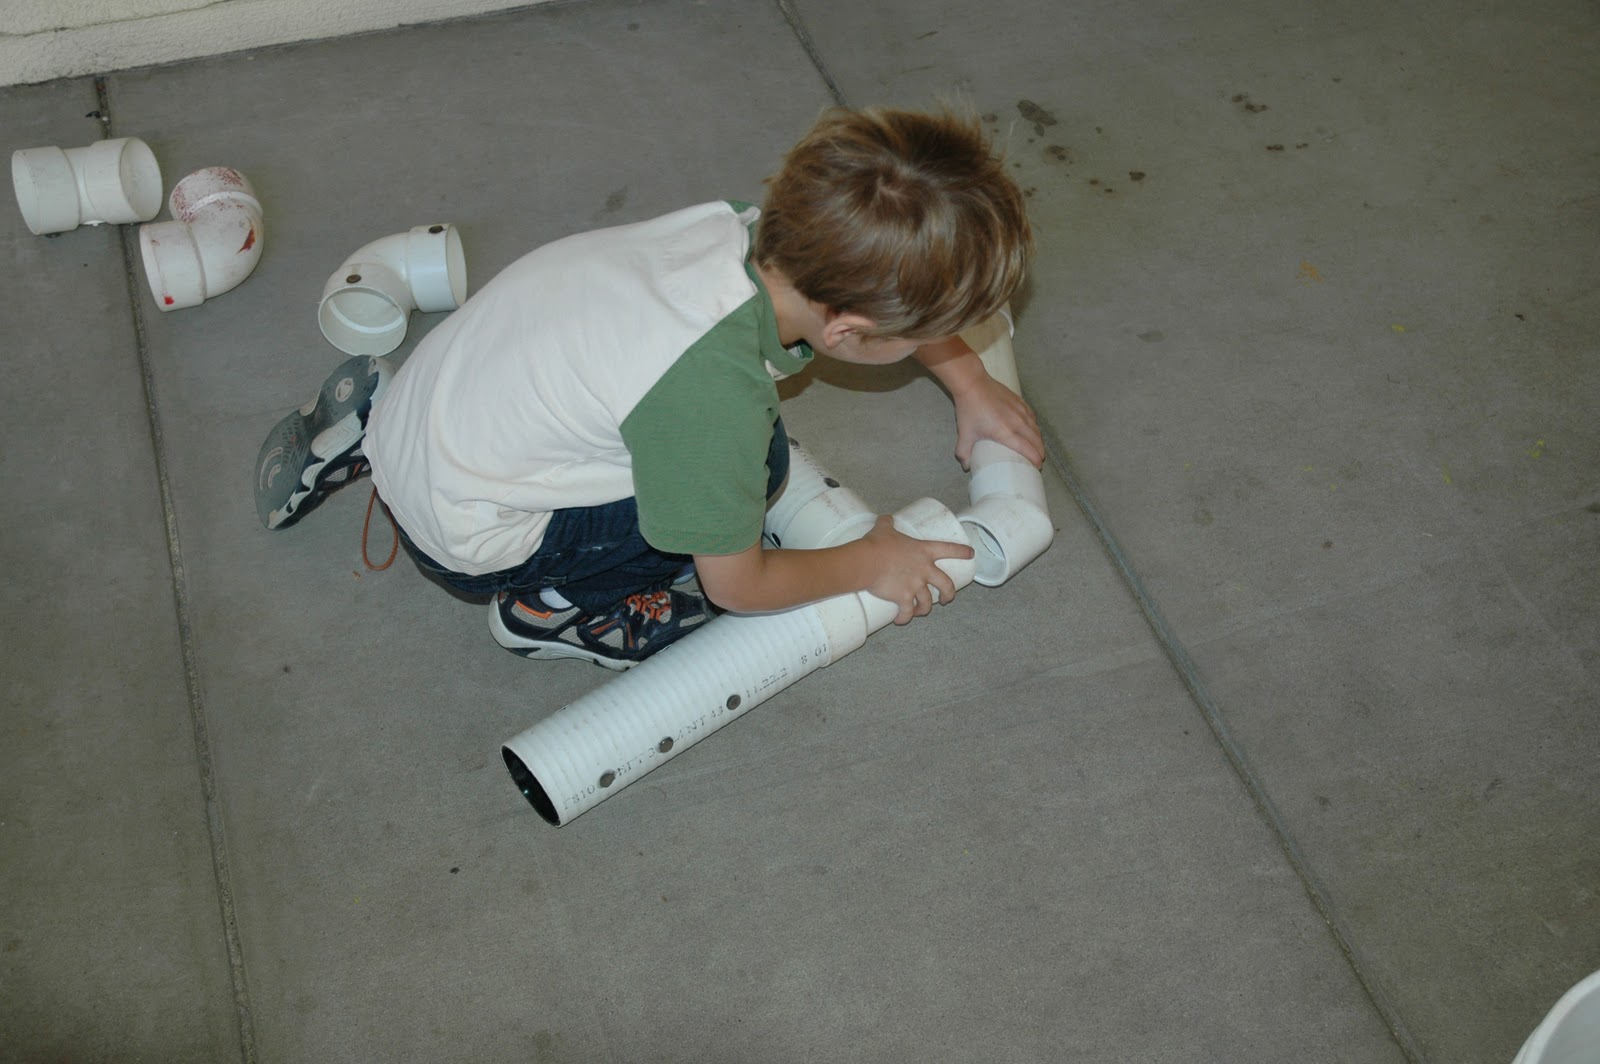
This week, one of the focus activities was PVC tubes and balls. I had the children explore various sizes of PVC tubes with varying sizes of balls (golf, whiffle, and marbles). Of course, my idea was to roll the balls into the pool, but that lasted for about...oh...30 seconds!


Soon, ramps, tubes and slides were being built across the patio and balls were running wild. The tubes were hooked onto the patio fence, window sills and the 5 gallon paint bucket that I was using to store the PVC. However, the kids were focused and intention and they were creating unique and effective ramps designed to jump balls into cups, race marbles with friends, and test out force and velocity. Did I worry that my intended method wasn't in use? NOPE! The children had taken their learning much further than my idea would have allowed. And that should be a teacher's goal...to allow children to create their own thoughts, processes, and understandings.


Today, I removed several pieces of the pipe and left only a few select balls. I lined the pool with paper, squirted in ample amounts of paint, and let them discover how the paint reacted to the different balls.


One boy realized that the lighter balls would get stuck in the paint, while the heavier ones would roll through to make the longest tracks.


I didn't put too many limits on how to use the pipes or shovels (which were technically added for the purpose of scooping up balls in case the children didn't want to get their hands dirty...lol!). The shovels became "hockey" sticks for the balls and were also used to shmear the paint. One little girl even picked up a clean sheet of paper and laid it across her favorite "ball painting" to make a mirror image.


Tomorrow, we will use 3/4" PVC with marbles and paint!


The other activities I set out were: a "construction zone" with gutters, blocks, and lego vehicles;


  clay;


tree blocks with forest animals;


painting and printing on leaves from our playground;


and a sensory bin filled with beans, magnet wands and small magnetic items (click the links to see detailed posts on these activities).

If you don't have a patio, then I would highly recommend bringing any of these activities into the yard. Remember...anything you can do inside, can be done BIGGER AND BETTER outside!!!


Wednesday, October 12, 2011

The Benefits of Using Natural Clay in Preschool


The Philosophy:
Clay stimulates the child’s curiosity. Intelligence, imagination, and creativity are engaged and fostered.  Many new neurons and synapses in the brain are being generated when a child is engaged by the immediate tactile and visual feedback provided by clay. -Marvin Bartel, Ed D.
Read Full Article: Clay for Toddlers and Preschoolers: How and Why

Pumpkins designed by a 4 year old girl.

The "Real" Experience: 
Let me be honest for a minute. When I saw the box filled with a HUGE lump of brilliant orange clay (you know...the kind that gets all over your hands and doesn't come out of your clothes) I was not overly excited about it. Actually, I was terrified of it. Personally, I LOVE working with clay. It was the thought of working with clay and preschoolers that I wasn't so sure about. So, I ignored it...for weeks.


About 3 weeks ago, I finally took the plunge and opened the bag.  I offered the children some basic tools and some spray bottles to keep the clay moist. I "trained" a few of the 5 year olds to be "clay teachers" in hopes that they could help the other children learn how to use it appropriately. As other children came out to the outdoor patio (my domain for their morning hour of free choice time), many looked on with great interest. Things were looking good!


It went well while I was sitting with them, but when I turned my back to assist some other children, utter disaster! Wet, mucky, dripping, oozing and everywhere! The spray bottles were nearly empty and the children were covered! We do tell the parents that the children will get "messy," but this may have pushed the limits of acceptable! A great "process" activity, but not something I would be mentally prepared to deal with on a daily basis! Since our goal is to offer clay on daily, something had to give. I guess they weren't ready for an endless supply of water yet! Lesson learned. 


Needless to say, a few weeks later (and a lot less water set out on the table!), the clay table is a fantastic success. Some of the children use the clay for no other reason than to ooze their fingers through it and to feel the cool, smooth texture. Others have learned that clay can be finely molded into virtually anything their little hearts and minds desire.


Tuesday, October 11, 2011

If You Build It, They Will Come

In my last post I talked about extending activities rather than "ditching" them when children appeared uninterested in an object or activity. So today, I decided to test out the theory again. This time it was our set of "tree blocks"in which I wanted to spark some interest.
I have put these blocks in our play yard several times for the children; and for several times, they weren't interested. At all. To be honest, I was shocked. I personally love the blocks! I mean, don't the children know that natural materials are all the rage? Don't they understand that playing with natural items will help them gain the much-needed and much-talked about connection with nature that the children of today so desperately need? I guess not. Let's face it...they are in it for the fun. It is the teachers who are in it for the philosophy. That said, it is up to us to "camouflage" the philosophy with "fun".
So, it was up to our storage room I went to find something interesting to add to the tree blocks. I walked into the "science room" and stumbled upon a bin of forest animals. These could definitely add some life to the blocks! This time, I put the blocks on our patio where our "older" pod (3-5yrs) can choose to play during their free choice time. Before the children arrived in the morning, I set up the table to look like a little forest with animals peering around corners and hiding under the blocks. As the children passed by on their way to class I could already hear them chatting to their parents about the forest table.


At first, only one child went to the table. It was a start. He asked me to play, so I sat with him and we enjoyed playing with the creatures and talking about the various types of animals on display. Slowly, several others joined the fun and soon I was able to back out and watch as their play unfolded.

They worked cooperatively for more than half an hour and created some very clever structures with the blocks. They called me over to see their creations. They were positively thrilled with themselves!


During the same play period, my coworker came over and commented on how his 3 year olds were not playing with the brand-new hollow blocks we just purchased. He is an extremely insightful teacher, so quoting Kevin Costner from Field of Dreams as he walked, he went over and built a great something...and the children came.

Ahhh, success!

These structures were made by the 3's class...after the teacher left!